Monday, June 29, 2009

Oh No! That's two weeks in a row with no TWD!

This is the first time I've ever done this. And I feel bad. But I don't feel as bad as the boy who was home all day today with a 104 degree fever. So my plan for making this cake to send with the girl to her pool party went right out the window.

Instead, I'll show the crazy that was the boy's birthday cake. The Lego cake. Actually, the eight small Lego cakes. Crazy. It was a whole Lego party, so we needed a Lego cake.

I will admit to completely cheating and using a box mix to make each 13 x 9. (One vanilla and one chocolate, because there needs to be choice) I also used canned frosting. I used a very simple idea from Betty Crocker. Gotta love Betty. In essence, you take your cakes, cut them into two rectangles and two squares, frost them, frost some marshmallow halves, and stick the whole thing together. It's not a hard concept. It's not even a hard thing to do. But by the sixth or seventh cake, I just wanted to be done.

Here's the first set of marshmallows. When it was still fun! I was very pleased with my solution for storing the marshmallows.

Here's the blue cake with the little marshmallow knobs on it. They were tricky to get off the toothpicks, but I finally figured out a system.

Here's the green version. Now there's eight of them!

And the green cake all done.

This was the first night's work. Four down, four to go.

Here's the full finished set of cakes. I will admit to getting a little sloppy at the end. I just wanted to be done.

The good news is that the boy loved it. I can't say that I would do this again. I don't think he'll have a Lego party again so I'm off the hook anyway. If you want to try this, and I do think you might, I have one big hint. Freeze the cakes after they have been cut. It makes frosting them much much easier.

Next week, I promise I'll be back with a Dorie recipe. In the meantime, go visit Carol's blog and see what a Perfect Party Cake looks like.

Monday, June 22, 2009

Not a TWD. Instead, I show my Cupcake Bites

My daughter's birthday was in April. She was having a small party this year -- just 12 girls. She had a painting party at one of those "do-it-yourself-ceramic-painting-objects-you-will-never-use-but-you-have-to-paint" places. (The girl painted a butterfly. I rest my case.) Since that was going to be the party favor, I didn't want to buy anything else. Hmmmmm. But I could make something..... And these popped into my head. Of course! Bakerella's Cupcake Bites!

First order of business: Find candy molds and candy melts. Check! Sort of. I used foil mini cupcake cups because I couldn't find the right candy mold. Next was to bake a cake. I went with the suggestion on the site and used boxed red velvet cake. It's very red. It cooled. I crumbled. I mixed in some canned frosting. I made small balls. I kept reading about how it made hands very messy and frequent washing was in order. Sidestep! I used my food safe rubber gloves! The balls were covered and put in the fridge.

Red cake crumbles in the bowl.


See! Messy gloves but clean hands!


48 small balls on this tray. 24 larger ones frozen for later use.

I decided to do a test with just one. I wanted to make sure they were going to come out before I put in the time. I melted some pink melts in a plastic bag in the microwave. I filled the foil cup about half full. I added a cold cake ball. Then I melted some yellow melts. I covered the top half of the cake ball. I added sprinkles.

Ta dah! A cupcake! So cute!


Since it was for the girl's birthday. She got the first taste. Mmmmmm. She liked it.


My niece, who is a wonderful baker in her own right, came to help me with the actual assembly of the 48 that we needed for the party. I had four colors of melts, so we started with twelve foil cups and one color. We used the next color for the top of those cupcakes and for the bottom of the next twelve and so on. There were a few different sprinkles this time around.


Four to a bag.


The party girls were thrilled. I would certainly make these again. Especially if I had my niece around to help me. Truth be told, I couldn't get myself to eat one of these. The idea of candy melts sorta weirds me out.

Sorry I don't have Coconut-Roasted Pineapple Dacquoise here to show you. But if you go to Andrea's blog, she'll have a recipe and fabulous example for you.

Saturday, June 20, 2009

Pssst. I have a secret.

I've stopped updating my TWD blogroll. There. I've said it. In a previous post I noted how Google Reader overwhelmed me. I want to be able to respond, and yet I get into gridlock. And now there are even more members. I am taking the ostrich approach. I have my fingers in my ears and I'm singing "I can't hear you" over and over.

So if you are new and wondering why I haven't ever commented on your blog, it's because I don't know you're out there. Yes, I feel guilty. And yes, I'm still not updating. A girl's gotta cope.

Tuesday, June 16, 2009

TWD: Honey Peach Ice Cream

I was glad for and nervous about this week's recipe. Glad, because us making ice cream signals summer at my house. (Last year, we traded who got to pick that week's recipe) My canister has been in the basement freezer sad and lonely waiting for a call to duty. But I was a bit nervous because it's not quite peach season. I can find some California peaches around here that are pretty good, but I'd rather use a fruit that's really in season. And I'm not a big fan of honey. There are few, if any, recipes that I use that call for honey. Still, I was going to trust that Tommi of Brown Interior knew what she was doing when she chose this recipe. (Check out her blog for the recipe. Or go buy the book already!)

So there I am at the store the other day. I found some peaches. They smelled pretty peachy. I took it as a good sign and bought them. I left them on the counter for a few extra days to get a little more ripe. Dorie called for four peaches that equaled half a pound. It took me six peaches to get there.

This recipe called for peeled peaches to be cooked with the honey and then pureed. It actually called for half the peaches to be cooked and added to the base and half to be added when the ice cream was being churned. We are not fans of chunky fruit in ice cream in our house. Too icy. So I cooked it all. I think it was a good decision. It mellowed out the honey flavor so that it was an accent and not overpowering. I made the custard yesterday. My custard came together pretty fast; faster than I think it was supposed to, but I didn't notice any ill effects. I added all the peach puree and then put it in the fridge to ripen overnight. Side note -- if the taste of the custard is any indication, this is going to be good ice cream!

I made the ice cream today. This made a very generous 1 1/2 quarts. It looked like the ice cream was trying to push its way out of the canister. More for us!

This ice cream was a big hit. The peach flavor was just right. The honey was subtle and added a nice sweetness. I used my homemade vanilla (read - alcohol based), so the ice cream stayed a nice scooping consistency. I absolutely think this is a recipe I would use again. I can see this being made with other fruit purees as well.

I used the immersion blender to puree the fruit. It was a good choice because it left little bits of peaches. You can see the peachy flecks.

Ice cream for everyone!

I've chosen next week as my skip week. I'll try to make something fabulous from another cookbook. As if there is such a thing...

Tuesday, June 09, 2009

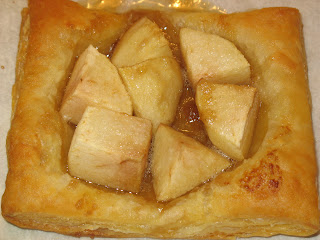
TWD: Parisian Apple Tartlet

I heart Jessica of My Baking Heart. I really really heart her. Dorie and her recipes are fabulous. I've tried many new and wonderful things. I've created many many dishes that the husband has to wash. Many dishes. This week's recipe was simple beyond belief. And not only was it simple, it was good. Really good. And versatile.

I needed four things to make this recipe. Four. The dishes? A knife, a cutting board, and a spoon. Four ingredients + three utensils + delicious = a total keeper.

Delicious like this.


And this.


It's frozen puff pastry topped with a few apple chunks, some brown sugar, and a bit of butter. Heaven. I will say that there are a few on the blogroll who couldn't leave well enough alone and made their own puff pastry. I say when there is Pepperidge Farm, why bother. The original recipe does call for a round pastry. If it's possible to be any lazier in this recipe, I found it. I cut squares.

Puff pastry, apples, brown sugar, butter.

I did mess around a little bit. I wanted to see if other toppings would work as well as the apples did. I have some lovely strawberry/vanilla/rhubarb compote in the fridge.

Before:


After:


Also completely delicious. The butter on this one was unnecessary.

And here's one that was just brown sugar and butter. Before:


After:


Very very good. Though I did lose a bit of the caramel. The good news was it stuck to the bottom of the pastry and I got to eat it anyway!

This is a recipe I can see myself making over and over again. It was simple beyond belief. My only note would be to cut the apples a bit smaller. I was afraid to let it bake much longer, and the apples had a bit more crunch than I would have liked.

I usually have puff pastry in the freezer. It would be a snap to pull it out before dinner, let it thaw during dinner, and then assemble the pastries while the table is being cleared and coffee is being made. Instant amazing dessert warm from the oven.

Thank you Jessica! Have I mentioned that I heart you? Next week is honey peach ice cream. The boy and girl are very excited about that one!

Tuesday, June 02, 2009

TWD: Cinnamon Squares

I have been eyeing this recipe for a long time. I love cinnamon and chocolate together. The husband is not such a fan. So until is was required for me to make it, I just waited patiently.

This is a very cinnamon-y cake. Very. For me, that's a good thing. There's something like three tablespoons of cinnamon in the whole thing. It's only an 8 x 8 pan. It's a cinnamon cake layer, a layer of cinnamon-sugar and chocolate, and then more cake. The Dorie fuss factor was low. I lower it by using dishes for more than one thing (the measuring cup for the milk was also the bowl for the liquids). Other bakers reported problems with baking this in a glass pan. I only had a Pyrex pan in this size, so, choices were limited. The cake came together easily and spread easily in the pan.

Here it is all sprinkled with chocolate, cinnamon, sugar, and espresso powder. Mmmmm.

It smelled amazing when it was baking. I love the smell of cinnamon. It took about ten minutes more than the recipe called for. As it cooled, I could see it sink a bit in the middle. I was a little worried, but it wasn't gooey. Then I flipped it over out of the pan to cool. I had a slight inkling that something wasn't right. I could see spots of chocolate on the bottom. The chocolate was in the middle, right?

So, it cooled. I made the frosting. I know I did something wrong here. It's chocolate and butter. Not many steps involved. Somehow, though, my frosting was not creamy and whipped looking. It was heavy. Like a slightly pliable chocolate bar.

Then it was time for eating. I cut into it. Hmmmm. No wonder there was chocolate on the bottom of the cake! It all sank almost to the pan. Not the layered beauty that was featured in the cookbook for sure.


I brought the cake to a family dinner the next day. The group mostly liked it. The frosting was a little more solid than I would have liked. It actually started to bloom a little on the edges. I really liked the flavor of the cake. One person suggested replacing the chocolate in the middle with pecans and making a brown sugar glaze. I think I might just do that. Or, I was thinking of tossing the powdered ingredients with the chocolate instead of layering it on top of the bits.

I'm pretty sure I'll try this cake again. I think it would be great for a brunch. Thank you Tracey of Tracey's Culinary Adventures for picking this cake. My patience was starting to wear a bit.

Tuesday, May 26, 2009

TWD: Chipster-Topped Brownies

I have wanted to try a recipe like this for a while. I mean, a layer of chocolate chip cookies over brownies... what could be bad? Certainly not these.

This started out as a slightly fussy recipe, but I lowered it considerably. First, I cut the recipe in half. I used an 8" Pyrex pan, which ended up being a good choice. The brownie layer calls for melting chocolate in a saucepan with butter. I stuck mine in the microwave. Worked like a charm. In a very unlike me move, I added the walnuts. I tend not to like nuts in brownies, especially walnuts, but I wanted to stay fairly true to the recipe. I used regular cooking spray to grease the pan.

Then I started in on the chocolate chip cookie layer. Now this is going to mess with some of you. I used the very same bowl for the cookie layer that I used for the brownie layer. I didn't even wash it. I happen to have mad scraping skilz. And, I'm lazy. I also figured it was all ending up in the same place, so, no washing. I didn't want to mess with half and egg and half an egg yolk that the original recipe called for, so I just used one egg. I cut the amount of chocolate chips in the cookie layer. Adding walnuts, cutting the chips, what's wrong with me this week? I thought that the brownie layer was chocolate enough, and I wanted to try to lessen the chocolate impact so the flavor of the cookie would come through. I used a teaspoon and a finger to put small dollops of dough all over the brownie batter. My favorite small offset spatula made quick work of smoothing the dough,

It went into the oven (not on a baking sheet, though Dorie calls for one) and baked for about 25 minutes. Even with just a spritz of cooking spray, the bars came right out of the pan. I cut the whole thing in half to see if I could differentiate between the layers. I could!

Here's the golden brown top.

And here is a view of the layers. The chocolate chips all sunk to the bottom of the cookie. I wonder if a sprinkling of flour would keep them more in the cookie batter.


Here are a few sliced and stacked.

I liked this recipe, but I'm not sure that I'm rushing out to make it again. The brownie flavor pretty much cancelled out the flavor of the cookie. Perhaps a peanut butter cookie dough might be more of a contrast. Surprisingly for me, I liked the walnuts.

Thanks to Beth of Supplicious for choosing this recipe. Go check out her blog if you'd like to see the recipe. Get this -- all of June is chocolate free! I know a couple of people who are pretty excited about this. I'm kinda looking forward to it myself.

Tuesday, May 19, 2009

TWD: Mango Bread

In a convergence of "how the hell did this happen?", I actually had all the things I needed to make this bread in the house. I know! I was excited, too!

I was looking forward to making something "everyday" from Dorie's book. Don't get me wrong -- I love the cakes and tarts -- but it's nice to make something that I feel slightly better about eating at three in the afternoon just before my little darlings come home.

On the Dorie scale of fuss, this was fairly low. It's a pretty standard sweet loaf bread/cake. There were some flavor additions that made it more interesting. It has a generous amount of ground ginger in it. The recipe called for golden raisins. I substituted my favorite Trader Joe's blend of dried fruit (golden raisins, blueberries, cherries, and cranberries). And there was fresh mango. My kids love the stuff, and it happened to be on sale last week (50 cents each!), so there it was in my fridge.

It only took two bowls, and I stirred by hand. I measured three different loaf pans until I finally found the right size. It took a long time to bake. And when I make something like this, I tend to err on the longer side. I've have more than a few loaves of something be less than done in the center and very done on the edges. I did have to tent this one to slow the browning.

It did make my kitchen smell wonderful. I was less enamored with the taste. For me, the overwhelming flavor was ginger. And not that that's a bad thing, but I would have liked for the flavors to be more balanced. I think that while the mango added moistness, it didn't bring much flavor to the table. The girl especially loved it. She had it for breakfast and snacks for two or three days. The husband enjoyed it as well. The boy was more on my side. I don't think I'm rushing out to make this again. I have other sweet bread recipes that I like better. Ah well. It was a good experiment.

Here's the loaf out of the oven. I was worried that it wasn't done in the middle and kept looking for it to sink.


Here's a top down view of the sliced loaf. Nice color!


I really like the way the dried fruit looks against the loaf. And you can see the mango chunks.


Thank you Kelly of Baking With the Boys for getting me to try something new. If you'd like to give it a try, go check out her blog for the recipe.

Sunday, May 17, 2009

Delicious Saturday night

The husband and I have some really wonderful friends. This past Saturday, we got together with six of them. I like these people. We always have a great time when we hang out with them. The other big bonus -- we always have great food as well.

We haven't had a dinner with them for a couple of months. Then I saw this recipe. And I knew I had to make it. I sent around an e-mail with the link to get everyone else drooling. We picked a date. I counted down to said date.

We usually do a "first come first served" dibs system. I wanted to make the torte and a pound cake I've been eyeing. One couple provided the house and an amazing smoked pork shoulder. (He uses Alton Brown's flowerpot smoker) Another brought prosciutto and parmesan wrapped green beans and truffled macaroni and cheese also with prosciutto. The third brought a wonderful simple green salad with walnuts, goat cheese, and dried cranberries and a sangria. Do you now see why I really like these people?

The recipes I chose were spectacular. The feta torte was crispy on the outside and creamy and tangy on the inside. I could have eaten so much more than I did. I wanted to. I just knew what was coming and forced myself to walk away.

This is what the finished torte looked like.

And this is a cross section.

I could easily see myself making this again. I've thought about doing it in my mini bundt pans and adding spinach for a brunch. I will warn you that this recipe is not for the faint of heart. It contains three sticks of butter, one pound of feta cheese, three eggs, and one and a half pounds of cottage cheese. It is soooooo worth all the calories, though.

Along with the appetizer, I made the dessert. I've had the book Sticky, Chewy, Messy, Gooey by Jill O'Connor for a while now. In keeping with my earlier vow this year to use more of my cookbooks, I decided to pull it out. The recipe for Brown Sugar Pound Cake caught my eye a while ago, but I've never had an occasion to make it. Tonight was the night. It looked simple to make. And it, too, sounded fabulous. It was easy to make. I should warn you that this recipe loaded up the calories as well. This one called for three more sticks of butter, eight ounces of cream cheese, one and a quarter cups of ground almonds, and six eggs. I served it with some rhubarb strawberry vanilla compote that I had made earlier in the day.

Here is my jar of compote.

Mmmmm. Ruby red goodness.

Here is what is left of the cake. It did not last long. Actually, there is nothing left of the cake. It makes me sad. We brought a bit of the cake home for the kids to try. The boy and girl gave it a huge thumbs up. Though, seriously, what's not to like?

It was a wonderful evening all around. Great company, delicious food, and some keeper recipes. Hope everyone else had some great food as well.

Tuesday, May 12, 2009

TWD: Tartest Lemon Tart

I love a good citrus dessert. You put lemon, lime, or orange into a dessert, and I'm eating it. I especially love lemon. Lemon cake. Lemon pudding. Lemon sorbet. Lemon bars. Lemon cookies. I love me some lemon.

I was intrigued by this recipe because it calls for a whole lemon. Well, you should take out the seeds first.

The crust couldn't have been simpler. It's basically a cookie crust that gets pressed into the tart pan. Dorie recommended the almond version, but I went with the regular version.

I'd read that some of the other bakers found the tart to be too bitter because of the pith from the lemon. Some recommended blanching it. I peeled my lemon into fairly thick slabs. Then I cut away a decent portion of the pith and followed the rest of the recipe from there. To finish it off, I dusted it with powdered sugar.

The end result was very good. It was just lemony enough with a touch of sweetness. I'm pretty sure that this will go into rotation. I wonder what it would be like with an orange or a lime instead....

Here it is cooling and unadorned.


And here is the finished tart.


Mmmmm. Don't you just want some? Here's your slice.


Thank you to Babette of Babette Feasts for choosing such a bright, summery dessert. Go check out her blog for the recipe. Or better yet, go buy the book and bake along!

Saturday, May 09, 2009

Happy Mother's Day!

Hope it's a day full of joy and love. Spend it with your mother. Spend it with someone else's mother. Spend it with your kids or grandkids.

Being a mom is tough. Being a mom is wonderful. The things I think are casual conversation now astound me. I rarely even blink when I hear a crying child in a restaurant let alone snark on the parents.

They make me laugh and cry. They are smart and funny. They are adorable and infuriating. They take my stuff and never put it away. They run to see me when they get off the school bus. They roll their eyes as if I know NOTHING. They ask me a million questions about everything. They are my pride and joy.

It's fitting that the photo has the kids munching on some of Dorie's Granola Grabbers.

Tuesday, May 05, 2009

Not a TWD: Instead, I bake seven cakes in 14 days

April is birthday month in these parts. The girl celebrates on the 18th and the boy on the 29th. What it means for the kids: cake and presents. What it means for me: baking.
We have a really fun tradition in our house. On birthday morning, we have cake for breakfast. The husband usually goes for a coffee cake or fruity cake of some sort.
The girl wanted yellow cake with peanut butter frosting.
Cake #1
For her party she chose mini cupcakes with chocolate or vanilla frosting.
Cake #2 (or just lots of cupcakes)
We have a family party the weekend in between the birthdays. Aunts, uncles, cousins, and grandparents come to share a meal and eat some cake.
The boy chose carrot cake with cream cheese frosting.
Cake #3
The girl wanted a Heath bar coffee chocolate whipped cream cake .
Cake #4
The boy's breakfast cake was banana with peanut butter chocolate frosting.
Cake #5
The boy's party had a Lego theme this year. You know what's coming.
Cakes #6 and 7
It's two cakes cut up and frosted to look like Lego blocks. (I'll have a "how I did it" post soon. I don't have one on why I did it, but that's a whole other thing)

What all this really means is that I just did not have it in me to make Dorie's Tiramisu Cake. I'm sure it was delicious. I feel especially bad because Megan of My Baking Adventures has become an internet friend of mine. Sorry, Megan! I promise I'll try it another time! Go check out her blog to see the cake in all its wonderful glory.

Oh, and if baking all those cakes wasn't enough, it's Teacher Appreciation Week. I'm on the committee. That means a breakfast casserole for Monday morning, Buttered Rum Meltaways for Tuesday lunch, and Ginger Cheesecake, chocolate dipped bananas, lemon lime frosted cookies, and browned butter brown sugar shortbread for lunch Thursday. WHEW!

I'll be back next week for an amazing sounding Tartest Lemon Tart.

Tuesday, April 28, 2009

TWD: Chocolate Cream Tart

Ok, truth be told, I wasn't very excited about making this recipe. I wasn't in the mood to make a crust. It's birthday central around here, and I have cakes coming out the wazoo. Really. But I skipped the previous week, so I'll make a tart.
This is a chocolate cream layered in a chocolate crust with whipped cream on top. What could be bad?

The crust was easy to make in the food processor. I decided to make the full amount of crust because I knew the extra would freeze easily. I found these adorable mini tart pans, so I joined many of the TWD bakers and made mine mini. And then I found my even mini-er pans and made some individual tarts. I took Dorie's advice and froze three of the mini tart pans full of uncooked dough. Now, when I have a chocolate crust emergency, I have some in the freezer. The crust baked up easily. Upon tasting one of the baked crusts, however, I was a little nervous. It was a bitter chocolate taste. I hoped that the chocolate cream and whipped cream would offset it.

I only made a 1/4 of the cream. Luckily, it was easy to reduce the recipe. I simplified the recipe (by mistake) and had some good results. I boiled the milk in the microwave. Worked great! I added the hot milk to the sugar, corn starch, and egg yolk and brought it to a boil. I added the un-melted chocolate to the pan (whoops!) and it worked out just fine. Into a bowl and into the fridge. Done.
I copped out on making whipped cream. I just didn't have enough stuff to cover. I opted for that faux standby -- Cool Whip.

So, it's time to assemble. I layer in the chocoate cream to the mini tart pan. Good. I spoon it into the individuals. Ooops! Should have taken those out of the pans first. Ah well. I'll remove the mini ring from the pan before I finish. I take off the outer ring. Good. I, for some unknown reason, decided to remove the metal plate from the bottom of the tart.

And then I got this.

Dang! About 1/4 of it fell into the sink. Dang!


So the rest gets covered with Cool Whip.


And the mini minis get covered as well.

The verdict -- these are really good. Really good. The slight bitterness of the crust is offset by the sweetness of the cream. The crust was incredibly crumbly. It wasn't bad, but I would have liked the structure to have been a little more stable. It was really easy to make the cream, and I do have three crusts in the freezer. I could see myself making this again. Or I could just bake off the crusts and fill them with ice cream. Could go either way.

Thank you Kim of Scrumptious Photography for picking this yummy recipe. Go check out her blog to see the recipe and to drool. Her photos really are fabulous.
I'm skipping next week. It's a Tiramisu cake. I'm sure it's amazing. But as I said above, I have cake coming out the wazoo. I have baked (or still have to bake) a total of six birthday cakes all in the last two weeks. All for two kids. That's my next post.