Tuesday, December 29, 2009

Not a TWD: Too much other stuff

I did not make the cheesecake. Truth be told, I'm not much of a cheesecake fan. Still, I like chocolate, so I would have made it.

If I didn't already have:

pecan pie
gingersnaps
cinnamon chocolate chip sour cream coffee cake
fudge
cinnamon sugar nuts
and chocolate mint cookies

in my kitchen. And subsequently on my hips and various other anatomical parts.

Go check out Tea and Scones for the recipe and a cheesecake shot!

Tuesday, December 22, 2009

TWD: My Favorite Pecan Pie

This is going to be a drive-by-posting. Just finished baking, and I'm off to see The Addams Family tonight.

Here's a photo of the pie. VERY dark crust. I used Dorie's recipe, but I think I'm going to go back to my favorite. I just find it easier to work with. My family will chomp tonight, I'll taste it tomorrow, and I'll let you know the verdict in an update.


***Edited to add - This pie got mixed reviews. The girl thought there were too many nuts. We did try to tell her it was pecan pie, but ah well. The husband thought it had too much cinnamon. I think the coffee flavor is a bit too pronounced. But I love the texture and the fact that it's not too sweet. I would definitely make it a get with a bit less espresso powder and cinnamon. And the crust that I like better.

Check out Brina's blog, Someone's in the Kitchen with Brina for the recipe.


Tuesday, December 15, 2009

Kitchen Reader Cookie Exchange

This month, instead of a book review, we're posting a favorite/meaningful/holiday-ish cookie. My cookie is a double gingersnap. I've been making then for more years than... well, for a long time. I got the recipe from this book: The Wellesley Cookie Exchange. Apparently, this is one of the oldest exchanges around. I'm unsure of the actual history, but I know they've been doing it a while and there are two cookbooks based on their treats.

This was my first real taste of ginger. I have absolutely grown to love this cookie like no other. This is my favorite winter cookie. It's the one people request when they ask me to bake for them. They are spicy and sweet, slightly crunchy and chewy, and, I think I need to go bake. I only ever need to look at this recipe once a year, usually in the fall, to refresh my memory. The page in the cookbook is appropriately stained.

I have no photos of the cookies that come from this recipe. I think we just always eat them before I ever get to take any. I'm stealing this photo (with full credits) because mine look just as yummy.
Ginger Snaps Recipe

Here's the recipe if you'd like to have some ginger nirvana:

Double Gingersnaps (courtesy of the Wellesley Cookie Exchange cookbook)

3 sticks butter, softened
2 c. granulated sugar
2 eggs
1/2 c. molasses
4 c. flour
2 t. baking soda
2 t. cinnamon
2 t. ground cloves
4 t. ground ginger
*sugar for rolling

In a stand mixer, cream butter and sugar. Add eggs and molasses and mix well. Blend the dry ingredients together. Add carefully to the mix. Stir just until no flour remains. Refrigerate the dough AT LEAST four hours. (I always make this the day before I want to bake.) Roll the dough into walnut-sized balls, and then roll in sugar. Place on ungreased sheet. Bake at 350 degrees for about 13 minutes. The cookies will puff up and then shrink and crackle.

*I have experimented with different kinds of sugar - granulated, coarse, ginger (the sugar left from candied ginger). All are delicious.

Happy cookies!


TWD: Cafe Volcano Cookies

Now doesn't that name just scare you a bit? There was no photo of this finished product. I had no idea what to expect. It was a pretty simple recipe with ingredients I had on hand, so it had that going for it. What the heck. I'll try it.

Luckily, we made sables last week, which called for egg yolks. This week's recipe needed egg whites. I love how that worked out!

This was a meringue-like cookie. Instead of beating the egg whites, however, we warmed them up with sugar and, in my case, cocoa. The original recipe called for espresso powder (hence the cafe part of the name). But the boy and girl are not fans of coffee things, so I went with cocoa.
I also used mostly toasted almonds and pistachios in place of the nuts Dorie called for. Since both my nut varieties were pre-toasted, I had even fewer steps to make these!

The whole recipe was made in one saucepan and then baked on a silicon mat. It was close to the easiest Dorie recipe yet. The resulting recipe was surprisingly good. The toasty flavor of the nuts went very well with the cocoa. And I loved the crunchy texture of the cookie. I made a half batch, and it disappeared within a day.

You can see how the cookies is reminiscent of a craggy lava field. But much tastier.


Since I used the girl's painted bowl last week, I had to use the boy's this week.

Thanks to MacDuff of The Lonely Sidecar for picking this one. I never would have tried it on my own. It's definitely an option for those extra egg whites left over from the sables that I have to make again.

Tuesday, December 08, 2009

TWD: Sables

Today's entry is short and sweet. Not unlike this week's recipe! Today I made sables. These are sables with an accent on the e. Not sables with a long a sound. Here's the good news; no matter how you pronounce it, they are delicious!

This is a basic French butter cookie. There were many variations in the book. While in the future I think I'd really enjoy a citrus, pecan, or spice version, for my first round I stuck to the basic recipe. This one was really simple. There were few ingredients. It only took one bowl and one piece of plastic wrap. I made half a recipe because we are full up on cookies here. (chocolate cappuccino and maple almond)

These are simple and lovely. I think next time I'll make them a little thicker to give them a sandier texture. These had a bit of snap because I let them get a bit brown. The edges might look a bit more brown than they are because I rolled them in demerara sugar.


One other bonus to these cookies - you can make the dough ahead of time and roll and freeze it. Then when you need a cookie fix, just roll them in sugar, slice, and bake! Thank you Barbara of Bungalow Barbara for this week's choice. Go check her blog for the recipe. Or go buy the book already!

***Just a little side note -- the girl painted the bowl, and she's loving all of the sweet comments that you are leaving about it!

Tuesday, December 01, 2009

Not a TWD: But it's Cookie Carnival Time

This week's recipe was supposed to be the Rosy Poached Pear and Pistachio Tart. And while it sounds delicious, and the title is fun and alliterative, I didn't make it. The recipe had a little too much going on for me after a weekend of enormous eating. Go see Lauren of I'll Eat You to see the tart. I just stopped by, and it's gorgeous.

This month's Cookie Carnival was a group effort. We voted on the cookie that we'd all bake. The winner: Pecan Pie Cookies courtesy of Land O Lakes butter. This was an incredibly easy cookie to make. It was a one bowl dough. Into the fridge for a bit of chill. The pecan topping was also really easy. I added a splash of maple extract because I love it in pecan pie.

The cookies were rolled into medium size balls. Then I got to stick my finger in the middle. Hehehe. The indention was filled with the pecan mix. A 12 minute bake later I had.... a mess. The cookies really spread and the filling leaked out of a lot of the cookies. They stuck to the baking sheet and it was hard to remove them.

For every one of these:

I had a lot more of these:


And these:


The really big problem with the broken cookies? I couldn't put those in the cookie jar! I wouldn't want anyone to see them. You can see where I'm going with this, can't you? I had to hide the evidence of my bad cookie removal. There was only one thing to do. See, did I mention the fact that these cookies taste AMAZING? I think I ate at least four or five or.... I think I'm going to have to try these again. Maybe freeze the dough this time, or use parchment or lots of spray to help stop the stick.

I'll be back next week with sables. Yum!

Monday, November 30, 2009

The Kitchen Reader

I've joined a new group! This one is called The Kitchen Reader. It's aptly named, because we read together and post reviews about "foodie" books. The book this month is called The Warmest Room in the House: How the Kitchen Became the Heart of the Twentieth-Century American Home by Steve Gdula.

It's an interesting read. It talks about how kitchens have grown and evolved according to what was going on in the world. Some things that really struck me was the concept of a "scientific" kitchen. In making things "cleaner" and "sanitized", lots of food traditions were being eroded away. Instead of using familiar ethnic seasonings, people in the early 2oth century were encouraged to use more mass produced foods. It's also interesting to see how certain advances, the microwave for example, came about. I enjoyed this book. In some places it was a little slow, but overall, the information was compelling. I liked following along over the course of the years to see where we've been and where we are going.

Next month instead of a book, we'll be sharing a favorite holiday cookie recipe. See you then!

Tuesday, November 24, 2009

Not a TWD: Instead, I do some experimenting for Thanksgiving

The only recipe I didn't complete for the month of November was the Chocolate Caramel Chestnut Cake. It looked lovely in the book, but the recipe had a few more steps than I was willing to deal with. This week's host is Britin, who chose the holiday bundt cake I made two weeks ago. Confused? Sorry. We'll be back on track next week.

I have been assigned a side dish and rolls for dinner on Thursday. I went to the source of all things good when it comes to side dishes and let Alton Brown guide me. I chose his green bean casserole, and I gave it a test run last night. There is nary a can in sight in his version. Yes, I know that millions have used this recipe for years. However, I like to cook from scratch as much as possible. Alton's recipe is similar. You make a creamy sauce, add the beans, and then top with crunchy onions. The crunchy onions did give me a bit of trouble. And I grabbed the wrong can of chicken stock and it wasn't low sodium. Regardless of those two little bumps, I really like this one. I'm going to double it and bring it on Thursday.

This is Alton's photo. Had I taken a photo, you would have seen mine looking just as yummy.

I tried making rolls. For some reason, the bread gods are frowning on me this week. I found this recipe. It sounded really good, easy, and versatile. I followed the instructions and instead of dough I got... glop. I added some flour to make it more dough like. It never rose. I baked some anyway to see if they might rise in the oven. Nope. I threw it all away.

Today I tried David Lebovitz's recipe for dinner rolls. This one was in the food processor. Easy! It took F O R E V E R for it to rise. So I stuck that one in the fridge to do an overnight proof/rise. I'll bake them off in the morning and see how they turn out. I did do a test on my yeast. Since neither dough really rose, perhaps my yeast was no good. Nope. It did just fine in a bowl of warm water with a teaspoon of sugar added.

Ah well. I'll keep looking, and hopefully I'll get something good before Thursday. Have a wonderful holiday, all. Enjoy good food. Watch some football if you are so inclined. And (if all is right with the world) celebrate with some good people.

Happy Thanksgiving!

Tuesday, November 17, 2009

TWD: Sugar Topped Molasses Spice Cookies

Hey! I'm in synch this week! This week's cookies were amazing. They were perfect for fall.

I was a bit skeptical at first. I have an absolute favorite gingersnap recipe (the one that everyone asks for). I already had a recipe for this kind of cookie, so why do I need another? I'll tell you why. Though this has ginger in it, it's not the focus. The molasses was really the star. This also had a secret ingredient that really added to the spiciness of the cookie.

This one was easy to put together. Dry ingredients in one bowl. Wet stuff in the mixer. Combine. Refrigerate. I've learned with a cookie like this to leave it overnight before baking. Better flavor. Plus, the dough was much easier to work with when it was cold. Getting back to those dry ingredients -- here's where the secret flavor came in. In addition to the ginger and cinnamon, Dorie had us add black pepper. It really added to the final cookie! I was hesitant, but I'm glad I added it.

According to the recipe, this makes 24 cookies. I have to add that it makes 24 HUGE cookies. I made mine a bit smaller, and they were still big! I think I got 48 cookies. Dorie cautioned us that they would spread like crazy. She was absolutely right. The dough balls were to be rolled in sugar and then flattened on the cookie sheet. I did a little sugar experiment. I rolled some in demerara sugar and some in sparkling sugar. Truthfully, in the end, we couldn't tell a difference.

Only eight to a cookie sheet. They got big! I should have taken an "after" photo for comparison.

You can see a bit of the sparkling sugar on the outside. They were thin, dark, and delicious.

Same cookies but showcased on a fall plate that the girl made.

Everyone who tried one of these cookies loved them. They were very thin and crispy with just a bit of chew in the center. If you can get them to last, they get better with age. The flavors blend and mellow and really stand out. On Saturday I made a maple pumpkin filling to go in some pecan cookie tart shells. It also went fabulously well spread out on one of these cookies.

Thank you to Pamela of Cookies With Boys for broadening my horizons.

Tuesday, November 10, 2009

TWD: All in One Holiday Bundt Cake

Out of order again! This time, instead of the crisp (which I made last week), I made this fabulous bundt cake. This one is a keeper. It was enjoyed by all.

It was easy to put together. There are quite a few components, but none of it was tough to deal with. This recipe calls for pumpkin, pecans, cranberries - fresh and dried, diced apples, and the usual cake ingredient suspects. I had never worked with fresh cranberries before. Really. They were pretty cool looking on the inside. The batter came together quickly in my stand mixer. Then into a greased bundt to bake for about an hour. This is a cake that makes the kitchen smell wonderful.

It came out of the pan with no sticking. Here's where I did a smart thing. I baked the cake the day before I needed it. I wrapped it tightly and left it on the counter so the flavors could ripen and meld a bit. Good call! I made a glaze with maple syrup, powdered sugar, and vanilla. It was a little on the thin side, but I liked it when it had hardened.

Very thin glaze. It made it shiny.
I am not a fan of pumpkin. At all. But this was so good! All of the flavors worked so well together. And since it had so much fruit in it, I was able to convince myself that it was healthy and therefore a good breakfast option.

See, there's the golden pumpkin and cranberries right there. Healthy!

Breakfast of champion. And bakers.

Thanks to Britin of the Nitty Britty for choosing such a great cake. (She made the crisp this week, but check back at her site for the recipe)

Tuesday, November 03, 2009

TWD: Cran-Apple Crisp

Yea! I have a hard drive again. Mind you the old one is still AWOL, but I'm working on it. Actually I'm spending obscene amounts of money to have someone else work on it, but I digress. Back up your data, folks!

On to the food! This month, because of the holiday, we are allowed to move things around a bit. The four recipes can be made and presented in any order. The husband liked the sound of the crisp, so that one came up first.

I love a good crisp. There's the contrast of the textures and, in this one, the contrast of the tart cranberries and sweet apples. The apple chunks took on a bit of a rosy hue.

Crisps also scream "Fall!" to me. They are homey and the perfect dessert for a cool autumn evening. This one was easy to make. The topping came together in an instant in the food processor. The cranberries and apples were tossed with a few ingredients in a bowl and then poured into a baking dish. Dorie's original recipe calls for individual crisps, but I just went with one big one. I was all about the easy. I was very happy to find fresh cranberries in my grocery store. And they were on sale! This baked for about 50 minutes. My kitchen smelled amazing.

It came out looking really good. The crisp crust was a gorgeous golden brown. I could just bake this stuff up and eat it as is.

It was hard to let it cool before eating it. I added a scoop of good vanilla ice cream, and... WOW! This was very good. Very. Good. I hate coconut. There was coconut in the topping. I didn't even really notice it. It just added a "something." I would absolutely make this again. I don't think I'd change anything.

Thank you, Em of The Repressed Pastry Chef for picking such a winner! Go see Katya's blog, Second Dinner for the official recipe for this week.

Tuesday, October 27, 2009

TWD: Cherry Fudge Brownie Torte

First off, I'm typing on the husband's computer, so I have no photos. They are on my computer. The one with the crashed hard drive. Keep your fingers crossed that the data recovery magicians can pull off a miracle.

On to the food! Want to know what's a really good idea? (Other than backing up your computer. Often.) Reading the recipe. It's helpful. It tells you little things. Things about saving four ounces of chopped chocolate to add at the end. Things about the mousse part needing at least four hours to chill. Oy.

This ended up being a really rich brownie cake studded with cherries and a hint of rum. It was slightly fussy. The chocolate and butter needed melting. (only seven ounces of chocolate!) The dry ingredients needed blending. The cherries needed boiling and flambeeing. And then it all needed to be mixed together.

Mine baked for about an hour. It came out cleanly from the pan. I sprinkled some powdered sugar on top and served it as is. I think that the mousse would have been tasty, but this was really rich on its own. The extra chocolate melted in added to the richness, I'm sure.

Thank you to April of Short + Rose for picking this recipe. Go to her blog to see what this should look like. Hmmm, I seem to be saying that a lot lately....

Thursday, October 22, 2009

I'm writing a new feature for the TWD site!

So excited! In an effort to spice up the TWD site a bit, the moderators asked for some suggestions and volunteers to help add content. I'm writing a feature (name! I need a name!) on ingredients and kitchen tools. Those you love, those you don't know how to use, those you need to expand on a bit, and those you covet. Go check it out. I post the 2nd and 4th Thursdays of the month.

Any ideas or suggestions for the feature? (column? post?) let me know!

Monday, October 19, 2009

TWD: Not this week

Sorry folks. If you came here looking for Sweet Potato Biscuits, you will be disappointed. I got to spend a glorious weekend away with the husband, and other people did all the cooking for me. Baking is a little more than I could get to right now. Once I climb over the mountains of laundry, I might be able to get back to the kitchen.

Go visit Erin's blog to see the recipe and what these delicious biscuits look like. I'll be back soon!

Tuesday, October 13, 2009

TWD: Allspice Crumb Muffins

I was really pleased to see this recipe this week. I love dessert. A lot. But it was nice to see something that I could (without guilt) serve the boy and the girl for breakfast. Not that pudding doesn't make a nice breakfast....

Anyway. I was excited by the comments from the other bakers. Most really loved it and praised the flavors and simplicity. As an added bonus, it was chosen by my internet friend, Kayte. She has amazing taste, so I knew this would be a winner. I really enjoy her blog. (Grandma's Kitchen Table) The boy and I set out making them this afternoon.

It was an easy recipe. Three bowls. One muffin tin. First up was the streusel. It was basic - butter, flour, brown sugar, and allspice. Dorie likes fingers for blending. I like my pastry blender.

Cutest sous chef ever.

Then comes the muffin. It's your basic formula. Wet ingredients get quickly blended into the dry ingredients. The muffins were scooped. (By the way, if you do not yet have an ice cream scoop for muffins and cupcakes, get one!) I got 12 muffins in the tin and two extras. The streusel was strewn on top. Here's where it got a little... off. I had more streusel than muffin top. But since I love the stuff, I put it all on anyway. Into the oven they went. Lots of good smells in my kitchen.

And out they came. Not so streusel looking. It's more like there's a sugar crust on top of the muffins. It's not a bad thing, but I was disappointed. They are not pretty. They did taste good, though. I wasn't bowled over as some of the other bakers were. I think they're good, but there needed to be more of something. Cinnamon maybe? I know that allspice was supposed to be the star here, but I didn't get a whole lot of the flavor. I think if I was to make this recipe again, I would add in some pecans or something. Maybe a bit less butter as well. There was a small puddle of butter in each of the muffin wells after I had taken the muffins out.

Dorie's notes say that the flavor intensifies overnight, so maybe in the morning the flavor will be more pronounced. The other tasters in the house enjoyed these. Maybe it's just me.

Here's one of the extra muffins. It was in this cute little heart-shaped foil pan. Here it is from the bottom.

Ooops. Here's a lesson -- don't over fill your muffin cups!

Thanks Kayte for the change of pace. Go visit her blog to see the recipe. Or go buy the book already.

Tuesday, October 06, 2009

TWD: Split Level Pudding

I have discovered the joys of homemade pudding. The chocolate pudding that we last made for Dorie was amazing. Sad to say, this one did not give me the same joy. It was a layer of ganache covered with a layer of vanilla pudding. It sounded delicious, and I was eager to make it.

The ganache was fine. What could be bad about heavy cream and bittersweet chocolate? The pudding layer was not so fine. Dorie's recipes call for her pudding to go through a round in the food processor. From my experience and from what I've read from other members, it does something to the pudding so that it doesn't set up as well. Although it spent about six hours in the fridge, my vanilla layer never quite set.

Here's the other thing for me. I didn't like the two layers. When it comes to pudding, I want a really rich chocolate or a really strong vanilla. The vanilla didn't shine through enough. The overwhelming flavor was the chocolate, which to me sort of defeats the purpose. Ah well. Maybe I'll just try the vanilla part without using the processor and without the chocolate. I will say that the boy and the girl liked it a lot. They ended up stirring the chocolate and vanilla together, so it negated any layers anyway.

Here's dessert for the family.

Ready for a spoon....

As close to a "layered" shot as we got. No layers here.

Here's what the boy and girl ended up doing. The liquidity of the pudding did something to the ganache layer, so it was pretty soft as well.

Thank you Garrett of The Flavor of Vanilla for choosing the recipe this week.

Thursday, October 01, 2009

Challah

So here's my post about challah. Challah is a traditional Jewish egg bread that is served on Shabbat and most holidays. It tends to be lightly sweet with a fine crumb. I make it about twice a month. I'll make two challahs, use one for dinner one week and freeze the other for the next. I make a simple braid most of the time.

Rosh Hashana is the Jewish New Year. (Literally - the head of the year). This holiday calls for a round bread. We eat round challah bread to symbolize the circle of the life and the cycle of a new year. It's not hard to form, but it does take a little practice. And a good visual.

My favorite recipe is a pretty basic one. Make the dough, let it rise, form the braids, let it rise, bake. This year I tried something a little different. I made the dough one day, and then I let it rise in the fridge for about 18 hours. Then I formed it and followed the rest of the rising/baking steps. It was good! It was a little sweeter than usual. I think it's because the yeast and the honey in the recipe had plenty of time to interact. The second rise also took a bit longer. No big deal. The dough was amazingly easy to work with when it was cold. This may now be my go-to method.

Here are the two challahs that I made last weekend:

Traditional braid - top and side view.


Any hints as to what I can do about the un-egg glazed parts in the middle? I think it rises more after I've put it in the oven. Re-glaze after a few minutes?

Here's the round woven version:

Top view. Shiny!

Side-ish view. Shiny!

Here's the recipe if you'd like to try it yourself.

Challah

1 scant T or 1 envelope active dry yeast (I use instant yeast from KAF)
3/4 c. warm water (1/2 c. now, 1/4 later)
1/2 t. sugar
3 eggs
1/4 c. honey
1/4 c. vegetable oil
1 T. vanilla extract
3/4 t. salt
4-4 1/2 c. flour

Stir together the yeast, 1/2 c. water, and sugar. Proof for 10 minutes (if not using instant yeast-otherwise, just add ingredients) Beat the eggs with the honey. Add 1/4 c. warm water, oil, vanilla, and salt. Add the yeast mixture. Blend well. (I do this with a whisk in the bowl of my stand mixer) Add 4 cups of flour to the bowl. Using a dough hook, blend until all flour is absorbed. You want a slightly sticky dough. If it's too sticky, add the remaining flour until it is a desired consistency. Knead on medium speed for about 4 minutes. Alternately, you can do it by hand for about 10 minutes. Place in lightly greased bowl, cover with plastic wrap, and let it rise until double - about 1-2 hours. (This is the step that I did overnight. I covered it and left it in the fridge for about 18 hours. Worked great!) Gently deflate dough and divide into two portions. Divide first portion into three sections. Roll them out until they are about 1" thick. Squeeze the dough together at one end and braid as you would hair. Squeeze the dough together again at the other end. Place on Silpat or parchment lined sheet. Repeat with second half of dough. Cover and let rise again - about 1 hour. (If you've done the overnight rise, the dough may take a bit longer to warm up and rise) Preheat oven to 375. Just before baking, brush dough with a wash made of one beaten egg and 1 t. water. You can sprinkle it with poppy or sesame seeds if you wish. Bake for about 25 minutes or until golden.

Did I mention that challah makes amazing bread pudding and French toast? I'm just saying...

Tuesday, September 29, 2009

TWD: Chocolate Crunched Caramel Tart

I will fully admit, up front, that I was very cheater-like this week. I did make this dessert, I just used a short cut or two. In my defense, on Thursday, I baked 300 cookies for a friend's wedding (she gave me the dough balls, I baked them off) The wedding was Saturday, and Sunday was Yom Kippur. I baked for the break the fast dinner (two challahs and a pound cake-post coming soon). So this wasn't exactly high on my list of things to bake.

Here's how I cheated. Remember this recipe? I had some crusts in the freezer. That's one pre-made component.


The caramel layer? Some dulce de leche that I made last month. I sprinkled the crust with the honey roasted peanuts and poured some dulce on top. That's two layers taken care of.


The third layer was some chocolate glaze that I had in the fridge. I melted it slightly, spread it on, and then let it chill again.

Ta dah! A chocolate crunched caramel tart! I will admit that the caramel scared the bejeebus out of me, so I'm kind of glad I didn't make it. I may try it another time.
You know, my cheater version was pretty darn good! All the flavors of the original in a chocolate crust!
Go check out Carla's blog Chocolate Moosey. She has the recipe and pictures of the real thing.

Tuesday, September 22, 2009

TWD: Cottage Cheese Pufflets

First, can I start out by saying that hosting was so much fun! The validation of all the comments made my low self-esteem rise just a bit for the week. I'll get to do it again in about a year and a half. ;-) Seriously, thanks for all the great comments. Seems the recipe I chose was a winner.

Now on to this week. I really liked the finished product. All two of them that actually came out... This was a TOUGH recipe in execution. In theory, it's simple. Just whir together some ingredients in the processor, chill your dough, roll, and then bake.

If only.

My food processor is a big one -- 14 cups. I had to make the full recipe of dough or it wasn't happening. In hindsight, I should have used my (slightly hated) mini prep and quartered the recipe. The butter kept creeping up on top of the blade and I had to stop a zillion times to push it down. The rest of the ingredients went in just fine. I got my VERY sticky dough onto a piece of plastic wrap and I put it in the fridge. Four hours or so later, I took out a quarter of the dough and rolled it out in a plastic bag. (The rest was well wrapped and put into the freezer) The bag went into the freezer. After what I had read from other bakers I figured it was a safer bet.

In the time that it took me to cut the three edges of the plastic bag off, the dough had become soft. Back into the freezer. Then I realized that it was too thick. Now I put it between two sheets of plastic wrap, rolled some more, and then it went back into the freezer. It came out, I cut it into squares, and.... it was already too cool and wouldn't transfer to the pan. I got two squarish pieces, I dabbed some jam in them, and then I dumped the rest of the dough onto the pan.

They baked. They browned. They were delicious! They were, however, such a huge pain to work with that I'm not sure what to do with the rest of the dough. Any suggestions? What bummed me out is that I've done a recipe for cottage cheese pastry before and it was much easier to work with. Maybe I'll post that one later in the week.

Here are the two that actually came out shaped and filled.

Here is the "dumped" set. I scored them on the plastic wrap and tried to separate them. Didn't work. So I just turned it out onto the parchment and dabbed some jam on.

Anyway, we liked the flavor. Even the dumped and topped ones. Oh, I used some cherry jam that I made with this recipe from David Lebovitz.

Thank you to Jacque of Daisy Lane Cakes for getting us to try something new. Go check out her blog to see what these are supposed to look like.

*** Edited to add: I just looked at my other recipe. It calls for the same amount of butter and cottage cheese but two cups of flour. I think that extra 1/3 of a cup makes a huge difference in handling.

Tuesday, September 15, 2009

TWD: Flaky Apple Turnovers

Do you believe it? This week is actually MY pick! Woo hoo! I perused the book many times over the past year wondering what I would pick when it was my turn. I knew it would depend on the season. I knew it would depend on what other people were picking. I also wanted to make a friendly recipe -- one that could be halved or quartered easily. I narrowed down my choices. It was almost fall, it had to have apple in it. After a bit more scrutiny, I chose the apple turnovers.

I love fall. I love apple season. I love these turnovers! They were flaky bites of deliciousness. There are two components to this treat. Each was easy to make, so I give this a low rating on the Dorie fuss factor. First I made the dough. Other recipes I have seen call for puff pastry. This was a different dough. It called for sour cream. Dorie credits the acidity in the sour cream for the tenderness of the dough. It came together easily for me. It needed a rest in the fridge for about an hour. At that point it gets rolled out and then folded like an envelope. Back into the fridge for an overnight rest. The next morning was part two. First I mixed up the apple filling. Then the dough got another roll out. This one was a bit harder. It took some elbow grease to get it to the right thickness. I got eight rounds out of the first roll. The remaining dough went back into the fridge.

I overfilled the turnovers a bit, and the dough didn't want to seal very well and developed a few holes. Totally user error. I brushed with the egg wash and used sparkling sugar for a finishing touch. They smelled amazing while baking. They came out a litter sooner then they should have, and the crust wasn't as golden as I would have liked. Second batch was rolled out, and I cut it into rectangles so I could use all the dough with no waste. I hate waste. These were filled with a homemade blueberry/rhubarb jam. Again, they smelled amazing. I let these go a bit longer, and they got that gorgeous golden color on them.

These were a huge hit at my house. They were NOT pretty. But who cares about pretty when they tasted so so good. They will definitely be back at my house. I really love that they can be formed ahead of time and frozen. That makes it really easy to put together an impressive breakfast. Or after school snack. Or midnight snack. Or... snack.

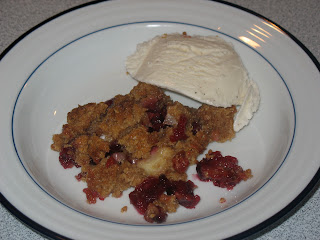
Ok, so not so golden brown. But delicious! And a little hole because I pulled the dough.

Here's the blueberry/rhubarb version. I let this one bake longer. And a little less filling helped.

Here's a lovely display of both versions.


Here's the recipe so that you can have this deliciousness in your own house.

Flaky Apple Turnovers

For the dough: 1 cup sour cream
1/2 cup sugar
4 cups all-purpose flour
1 teaspoon salt
3 sticks (12 ounces) cold unsalted butter, cut into small
pieces

For the filling: 1 tablespoon all-purpose flour
1/2 cup sugar
1/4 teaspoon ground cinnamon
4 Fuji or Granny Smith apples, peeled, cored, and cut into small chunks
3 tablespoons cold, unsalted butter, cut into small bits

1 large egg, beaten with 1 teaspoon water, for egg wash
sugar, for dusting

To make the dough:
Stir the sour cream and sugar together; set aside.

Whisk the four and salt together in a large bowl, then toss the butter bits over the flour. Working with a pastry blender, two knives or your fingers, cut the butter into the ingredients until the mixture resembles coarse meal. Don't worry about being thorough - it's better to have an uneven mix than an overworked dough. Switch to a fork and, using a lifting and tossing motion, gently stir in the sour cream. The dough will be very soft.

Divide the dough in half. Put each half in a piece of plastic wrap and use the plastic to shape each piece into a rectangle (don't worry about size or precision). Wrap the dough and refrigerate it for at least 1 hour, or for up to 2 days.

Remove one piece of dough from the fridge and roll it into a rectangle about 9 x 18 inches. The dough is easiest to work with if you roll it between sheets of wax paper or plastic wrap - if you want to roll it traditionally, make sure to flour the rolling surface. Fold the dough in thirds, like a business letter, wrap it and refrigerate it. Repeat with the second piece of dough, and refrigerate the dough for at least 2 hours or up to 1 day.

To make the filling:
Whisk the flour, sugar, and cinnamon together in a large bowl. Add the apples and toss to coat.

Getting ready to bake:
Position the racks to divide the oven into thirds, and preheat the oven to 375 degrees F. Line two baking sheets with parchment or silicon mats.

Roll out one piece of dough to a thickness of about 1/8 inch, and cut out 4 1/2 inch rounds with a large cutter or the edge of a tartlet pan. Repeat with the second piece of dough. If you'd like, you can gather the scraps together, chill them, and make additional turnovers. (The turnovers made from scraps will taste good, but they won't be as pretty and light as the first rounders.) You'll get 7 or 8 rounds from each piece of dough.

Place 1 to 2 tablespoons apples in the center of each round and dot with the butter. Moisten the edges of each round with a little water and fold the turnovers in half, sealing the edges by pressing them together with the tines of a for. Use the fork to poke steam holes in each turnover, and transfer the turnovers to the baking sheets. (At this point, the turnovers can be frozen; wrap them airtight when they are firm and store them for up to 2 months. Bake them without defrosting, adding a few minutes to their time in the oven)

Brush the tops of the turnovers with a little of the egg wash and sprinkle each one with a pinch of sugar. Bake for about 20 minutes, rotating the baking sheets from top to bottom and front to back after 10 minutes. When done, the turnovers will be puffed, firm to the touch, and golden. Gently transfer them to racks and cool to room temperature.


Tuesday, September 08, 2009

TWD: Chocolate Souffle

Ok, this was just.... fail. I've made a chocolate souffle before. It was lovely and delicious. This one was not. I don't know where I went wrong on this one. I made a half recipe. I read about other TWD bakers who made smaller amounts and used their baking times. I followed the instructions. I even used a baking sheet lined with a silicon mat. I don't usually use a pan when Dorie tells me to, but this time I did.

And I got two sad ramekins of chocolate goo. I couldn't even bear to take pictures. So this will be a sad photo-less entry. And I am also sad. Really, it was very sad. I couldn't get past the texture to even try to appreciate the taste. Maybe I overbeat my whites? Maybe I used lousy chocolate? Maybe it was the silicon lined pan.

I don't know. I may try this one again, but I'm a bit souffle shy right now. Sigh.

Well, next week is my pick! This one will not fail! At least it had better not.

Tuesday, September 01, 2009

TWD: Espresso Cheesecake Brownies

I'm pretty sure I've made my feelings about brownies pretty clear. I like them, but they seem to be ubiquitous. Remember, these are the only baked good where I'll willingly use a mix. Here's what's interesting about this week's recipe -- I'm not too much of a cheesecake fan, either. If I never ate it again, I don't think I'd miss it. It's not something I crave or seek out. If it's there, and there aren't other better choices I'll eat is.

Which is why I was so surprised that I liked this recipe as much as I did. And I really really like this dessert. It was fairly low on the Dorie fuss factor. I really only needed two bowls and then the pan to bake it in. I followed the recipe almost entirely. The one change I made was to substitute a good bittersweet/orange/almond chocolate for the plain chocolate. A) I had it and B) it sounded like it would work. Oh yeah, and I skipped the topping. Again. This seems to be a habit with me lately. Truthfully, it wasn't missed.

This called for ingredients that I already had. (Psst. If you haven't discovered and purchased espresso powder from King Arthur Flour, you should) The chocolate was probably an impulse buy at one point. The brownie layer is made first. Then the espresso cheesecake. Most of the brownie batter gets spread into the pan with the cheesecake batter next. Mine seemed awfully runny, so I was a tad worried. I don't think I kept out enough brownie batter. My swirls are kind of pitiful. I took these out when they were slightly brown and pulled away from the pan. Just like Dorie said!

The testers really enjoyed this one. The boy was not as enthusiastic. I would certainly make this again. I really liked the way the flavors played against each other. The coffee taste was clear but not overwhelming. The orange added a nice element, and I liked the slight crunch of the almonds. Maybe next time a plain chocolate and add some cinnamon?

Here they are in the pan. They REALLY pulled away from the side. Not so swirly.

Here's one piece. I really need to work on my food photography.

And another piece. Still not so swirly.


Thank you Melissa of Life in a Peanut Shell for choosing this yummy dessert.